 One of the most visited pages on this site and our Sea Trek site are the postings for our simple and inexpensive WiFi system that we have been using for years. Many of our cruising friends use WiFi, as we do, to get online, gather weather information, send and receive emails and do all of the other things people do through the Internet. For years, we have used available WiFi, whether from an open access point or from a marina, hotel or restaurant. If anyone has been on a boating site lately, the discussion has turned to Firesheep, a program designed to allow anyone with it on their computer to access your Facebook page while you are logged in and do anything you can do. There is one fellow out there, I won't mention his name, that has been on every boating discussion board on the net, doing his absolute best to scare the crap out of anyone that will listen. This fellow is making some claims that would lead the less educated in all things computer to believe that if a 12 year old has Firesheep on his computer, he can steal your life, take over your identity and clean out your bank account. He would have you believe that if you use any open WiFi, the sky will fall and life as you know it will end.
Open WiFi On The Boat And Firesheep And Other Man-made Disasters
One of the most visited pages on this site and our Sea Trek site are the postings for our simple and inexpensive WiFi system that we have been using for years. Many of our cruising friends use WiFi, as we do, to get online, gather weather information, send and receive emails and do all of the other things people do through the Internet. For years, we have used available WiFi, whether from an open access point or from a marina, hotel or restaurant. If anyone has been on a boating site lately, the discussion has turned to Firesheep, a program designed to allow anyone with it on their computer to access your Facebook page while you are logged in and do anything you can do. There is one fellow out there, I won't mention his name, that has been on every boating discussion board on the net, doing his absolute best to scare the crap out of anyone that will listen. This fellow is making some claims that would lead the less educated in all things computer to believe that if a 12 year old has Firesheep on his computer, he can steal your life, take over your identity and clean out your bank account. He would have you believe that if you use any open WiFi, the sky will fall and life as you know it will end.15 Steps To New Ports For The Boat

Our original 30 year old ports were really looking pretty shabby and a couple of them had begun to leak. We did some temporary caulking, which I don't like to do, but it was obvious that it was time to replace them. After a lot of research, we found some very good looking stainless steel ports at New Found Metals and ordered the 5X12 Stainless with screens and all of the needed materials for installation. We have received a lot of positive feedback from other boaters that have installed their ports and were very happy. The price was pretty good, and the ports arrived in short order. It was time to start the replacement process.
The Okeechobee Waterway
Excerpt from the 2011 Southern Edition Waterway Guide :

The Okeechobee Waterway is considered by many to be the dividing line between Central Florida and South Florida. When traveling from the north, this is where you will begin to see greater changes in the climate and vegetation, and even in the people—more “Northerners,” either seasonal “snowbirds” or full-time transplants, and a decided increase in the Latino culture.
 Opened in 1937, the Waterway offers a chance to see rural Florida, with small towns much as they were early in the last century. The scenery varies as the passage progresses from east to west from river to canal, to lake, to canal, and back to river again. On the Okeechobee Waterway, ranches and big commercial farms alternate with moss-hung wilderness, while bustling boomtowns coexist alongside sleepy villages that popped up long before Miami was built. With its backwaters and “bywaters,” its islands and coves, and its flora and fauna, the Caloosahatchee River was once the only way to get from the Gulf of Mexico to Central Florida, via small steamers and freighters. Some still consider the Caloosahatchee (76.6 miles) the most scenic part of the Okeechobee Waterway, thanks to the old river’s off-channel oxbows. Small cruise ships now occasionally make the trip.
A New Dinghy And A Big Change
We posted this on our Beach House blog and we thought we would share it here since our sailing friends might be interested also.
Cruisers know that the dinghy is the same as the family car when we live ashore.It gets you to shore to buy groceries, visit with friends, and reach those beaches and snorkel spots that can't be reached with the mothership. Ask ten cruisers what the best dinghy is and you will get ten different answers. It will turn out to be one of those discussions like anchoring or cleaning the holding tank. The opinions will fly and the discussion will go on for a long time.

Cruisers know that the dinghy is the same as the family car when we live ashore.It gets you to shore to buy groceries, visit with friends, and reach those beaches and snorkel spots that can't be reached with the mothership. Ask ten cruisers what the best dinghy is and you will get ten different answers. It will turn out to be one of those discussions like anchoring or cleaning the holding tank. The opinions will fly and the discussion will go on for a long time.

12 Small Boat Projects that Made Large Improvements
Sometimes it is the little things that can make a big difference. Most of the posts here cover our projects and improvements, and while many are serious undertakings, some are simple, quick and easy, but once finished, solve a problem or shortcoming we have encountered. With any new boat, there are always those little things that drive you crazy sometimes. Here are a few things we felt needed doing that paid off.
Cooking Aboard – Tips Tricks and Recipes by Susan
You would think after living aboard for 18 years, I would know all of the tricks to cooking aboard. I only know what worked for us, and maybe some of my ideas and tips will work for you, too.
We started out on a 40 foot sailboat with a large galley and a lot of storage. Whether you are planning for a long trip of many months or a week on the river or bay, you will need to buy provisions for the boat. We have done both kinds of trips.
Hurricane Preparations For The 2010 Season

Have you ever had the experience of sitting out a hurricane on your boat? Have you had to leave your boat and wait out a storm, wondering if it would survive? We have done both and neither are experiences we want to go through again. Sitting on board, listening to the wind howling in the rigging and climbing on deck during pelting rain just to adjust dock lines and anchor rode is not our idea of cruising fun, and the anxiety factor is off the charts. Sitting in a hotel room hundreds of miles away, not knowing if the boat made it through or if your next contact is the insurance company. June is just the beginning of the hurricane season, but it is also a good time to get yourself and your boat prepared. With our former boat Sea Trek, we have been through fifteen named storms, twelve of them hurricanes. So we do have some first hand knowledge for preparing and we thought this a good time to share our experiences.

Given a choice, our preferred place to have the boat ride out a storm would be in a well protected, open anchorage, shielded from wind and wave action. In our opinion, the place you would most likely expect to have the boat damaged is in a slip. It is almost impossible to adjust dock lines to compensate for storm surge and not have lines so long that the boat could be slammed against the dock and pilings. During hurricane Georges, in the Florida Keys, we tied the boat up in the middle of the basin of the marina, with an anchor out at the bow and several long lines ashore. After the storm passed, we were the only boat in the marina undamaged to some extent. We rode out hurricane Floyd anchored in the Wye River in the Chesapeake and the wind howled for two days. We were at the head of the river so there was very little wave action and since we are always confident of our ground tackle, we were never concerned about the anchor dragging. We did have two anchors set, and having the proper anchors and rode are very important to your success and the boats safety. One of our biggest concerns is other boats dragging or breaking loose and fouling our anchor. We look for safe harbor in the most remote spot we can find, far away from where the other crowds gather. In Belhaven, NC we rode out hurricane Irene in a large creek with just two other boats while another smaller and narrower creek just north of us had twenty or more boats sheltered there.


- You need to have a plan.Where will you go, and will your family need to meet you there? Be sure you have phone number handy for friends, family members, doctors, and any others you feel will be important, and possible contacts you might need for up to a week after the storm. If your phone will allow you to send text messages, they sometimes will get out when a call will not. Be sure you know your evacuation routes if needed and cars are fuel up and stocked for emergencies. Is your emergency kit accessable to you in a hurry? Make sure family members understand what circumstances determine whether you stay for a storm or evacuate. The local authorities might require a mandatory evacuation.
- Prepare an emergency kit. You can easily buy everything you need at your local storms, but the shelves might be empty just prior to the storm. So put your kit together NOW.
You may need to survive on your own after an emergency. This means having your own food, water, and other supplies in sufficient quantity to last for at least three days. Local officials and relief workers will be on the scene after a disaster, but they cannot reach everyone immediately. You could get help in hours, or it might take days. In addition, basic services such as electricity, gas, water, sewage treatment, and telephones may be cut off for days, or even a week or longer.

We have posted on our Sea Trek site, a few occasion where we prepared the boat for less serious storms. These preparations can be used in many cases, but for major storms, additional care will be needed. You can read those posts here;
http://sea-trek.blogspot.com/search/label/04.%20Hurricane%20And%20Storm%20Prep
http://sea-trek.blogspot.com/search/label/0028.%20Dealing%20With%20Hanna It is our hope that some small piece of information here will help in getting you prepared for this coming season and we also hope that all of your preparations will be a total waste of time.
Recommended Items to Include in a Basic Emergency Supply Kit:
- Water, one gallon of water per person per day for at least three days, for drinking and sanitation
- Food, at least a three-day supply of non-perishable food
- Battery-powered or hand crank radio and a NOAA Weather Radio with tone alert and extra batteries for both
- Flashlight and extra batteries
- First aid kit
- Whistle to signal for help
- Dust mask, to help filter contaminated air and plastic sheeting and duct tape to shelter-in-place
- Moist towelettes, garbage bags and plastic ties for personal sanitation
- Wrench or pliers to turn off utilities
- Can opener for food (if kit contains canned food)
- Local maps
- Cell phone with chargers, inverter or solar charger
Additional Items to Consider Adding to an Emergency Supply Kit:
- Prescription medications and glasses
- Infant formula and diapers
- Pet food and extra water for your pet
- Important family documents such as copies of insurance policies, identification and bank account records in a waterproof, portable container
- Cash or traveler's checks and change
- Emergency reference material such as a first aid book or information from www.ready.gov
- Sleeping bag or warm blanket for each person. Consider additional bedding if you live in a cold-weather climate.
- Complete change of clothing including a long sleeved shirt, long pants and sturdy shoes. Consider additional clothing if you live in a cold-weather climate.
- Household chlorine bleach and medicine dropper – When diluted nine parts water to one part bleach, bleach can be used as a disinfectant. Or in an emergency, you can use it to treat water by using 16 drops of regular household liquid bleach per gallon of water. Do not use scented, color safe or bleaches with added cleaners.
- Fire Extinguisher
- Matches in a waterproof container
- Feminine supplies and personal hygiene items
- Mess kits, paper cups, plates and plastic utensils, paper towels
- Paper and pencil
- Books, games, puzzles or other activities for children
- Stay informed through as many sources as possible. Have online sources for weather and hurricane tracking and forecasts bookmarked on your computer. Stay tuned to local weather broadcasts and national information like The Weather Channel. Power failures will be common so battery operated devices will help, just be sure you have lots and lots of batteries. Cell phones will work if land lines go down, but you will need to keep the batteries charged. A small portable generator will make a considerable difference in the days to come if there are major power outages for long periods of time. Have enough fuel for the generator to last a week and store it safely. A WORD OF CAUTION, never run one of these generators inside or in any enclosed, confined area. You could survive the storm to loose your life from carbon monoxide poisoning. We have a portable Honda 2000 Generator that has been invaluable during these storm conditions on many occasions.

We have posted on our Sea Trek site, a few occasion where we prepared the boat for less serious storms. These preparations can be used in many cases, but for major storms, additional care will be needed. You can read those posts here;
http://sea-trek.blogspot.com/search/label/04.%20Hurricane%20And%20Storm%20Prep
Installing A Marine Electrical Panel In A Day

Prior to purchasing Beach House, we had a thorough survey done by Bob Dulce from Hilton Head South Carolina. Bob knows the Marine Traders intimately, as he has been involved with them since the first hull was imported into the U.S. He is also an excellent and knowledgeable surveyor that understands what can happen when a survey reaches an insurance company with a lot of "recommendations." They immediately become "requirements" as soon as a clerk at the insurance company sees them. So items that were not major, but needed attention at some point, were made known to us during the survey, but did not find their way on to the final report. One of those items was an electrical panel that a previous owner had installed in the hanging locker for the forward cabin. As was the practice during the late 70s and early 80s, a household electrical panel had been installed to service the added air-conditioner, some 120-volt lights and an added outlet in the engine compartment. The panel was in good shape and wired correctly so there was no urgency to replace it immediately. So it went on our to-do list. In time, it finally rose to the top of the list, and the weather cooperated so that neither the heat or the air-conditioning would be needed for an entire weekend--plenty of time to complete the project. So it began.

The first item of business was to find the appropriate spot to mount the panel. We had considered putting the new one back inside the locker where the old panel had been. It was out of the way and the wiring was already there, a tempting prospect. But it was also a pain having to go in the locker behind all of the hanging clothes, we could not see to monitor the gauges and breakers, and we did not like having clothes hanging right next to an electrical panel. Outside the locker did not leave a lot of options. The panel needed to be accessible, yet not in an area where it could get bumped and the breakers accidentally turned off. At first glance, we ruled out anywhere on the front of the lower helm station. But after some study, we decided that this would actually be a good spot since we had instant access, and by putting it high enough and slightly behind the wheel, we would have to try very, very hard to bump it or come in contact with the panel so as to be a problem.

The next step was to cut the hole to fit the connections and breakers that stick out from the back of the panel. We chose the Blue Seas panel because we knew from past experience it was of good quality. They provide a template with the panel to make cutting the hole easier. An important issue is to be sure there are no wires, plumbing or anything else that will interfere with the mounting on the back side of the bulkhead. We used the template on the inside to determine where the panel would be mounted by tracing it on the inside wall, then drilling small holes in the corners. We could then transfer the template to the front of the bulkhead by using the small holes as a guide. The entire area where the panel was to be mounted is covered with easy release blue tape, and then the template is drawn on the tape with a fine tip marker. I like to drill holes in the corners with either a small hole saw of drill bit large enough to accept the blade for my jigsaw. Once this is finished, the hole is carefully cut for the panel and all of the sawdust vacuumed. In addition to replacing the panel, we were also replacing the shore panel outlet mounted on the outside cabin side. The old outlet was plastic, quite old and beginning to deteriorate. This is actually what started us on this project. The new stainless outlet would match the other Marinco outlet that we had previously installed.

The panel is put in place to be sure it will fit the cut out, and to make sure it is straight and not mounted on an angle. It is also the time to check that all of the wiring that needs to be connected will reach the panel and be clear of obstructions in the back. Any slight trimming of the cut out or a little sanding to make a better fit can be done now.

With the hole cut and the tape removed, the holes are drilled slightly smaller than the screws that will hold the panel in place and the fitting checked one more time. There is usually lots of sawdust and debris on both sides of the bulkhead, so a good vacuuming and wipe down is in order. We usually like to take this time to sand and varnish the area around where we are doing the work to avoid taking everything apart later.

Before doing any work on the boat's electrical system, the power must be turned off at the breakers on the dock and the shore power cords disconnected. The old shore power outlet was removed, and as is our practice, the core material around the cut out is sealed with West System, and then a thickened epoxy is used to fill in uneven spots and holes. The epoxy is sanded smooth before the outlet is installed. This insures that any leaks will not work their way into the core and cause rot and other problems. Even the screw holes get an injection of epoxy.

The new outlet is installed, and even with the gasket provided from the manufacturer, we use additional sealant to prevent water intrusion. Everyone has their favorite brand, but we like to use SikaFlex for most of these projects. Prior to re-installing the outlet, it is wired with long enough wire to reach the new panel. This panel would feed the air-conditioner, hot water heater, a few outlets and 110-volt lights. It is a fairly heavy load, so care needs to be taken in using the proper wire size. I used a #8 wire on both of our outlets to connect to the panels, even though the run from the outlet to the panel is only a couple of feet. The green earth grounds from both outlets go into our galvanic isolator and then to the panels. The hot and neutrals go directly to the main circuit breaker for each panel.

The wiring can be done with the panel in place from the back, or in some cases I prefer to connect up everything before the panel is put in place if there are not too many connections. I would add a word of caution here. Unless you have a complete understanding of the proper methods for wiring a boat, I highly recommend you hire a professional. I have been doing this for many years as a profession, so it is fairly simple for me. The wrong connections or improper installation can have catastrophic consequences. Once all of the connections are made and the panel secured in place, all of the wiring needs to be secured. We tend to use lots of wire ties and wire straps to keep everything neat, organized and from moving around, which can cause connections to come loose and wire to chafe through.

This time, because of the time it would have taken to make some repairs to the wood and varnish the surrounding areas, we did not refinish. That will get done later. With everything in place and all connections tested to be sure they were secure and tight, it was time to connect the shore power. Our practice is to make sure everything on both panels is turned off. The dockside breaker is also turned off, and the shore power cords are plugged in at the dock and the boat. The next step is to turn on the breaker on the dock, and check the voltage meters on the panel for proper voltage. The reverse polarity lights should not be on on either. If they are, something is wrong, and the power should be turned off immediately. If all goes well and looks good, the circuit breakers on the panels should be turned on one at a time, waiting a brief moment between turning each on. Watch the voltage meter for sudden voltage drops, since this could mean a short or other problem. Watch the reverse polarity light as each breaker is turned on. If everything was done correctly, the appliances, etc. can now be switched on. This is a small, relatively simple panel, but if a larger panel with more complicated wiring and DC breakers are included, a much more comprehensive approach is needed. But if a small auxiliary panel is needed, this will get you back in business without a great deal of expense. If you are not sure of your abilities, get the advise of a professional.

US Naval Academy Commencement Week

Commencement Week for the US Naval Academy in Annapolis Maryland is a major event for both the Graduates and Midshipman at the Academy, and also for the city of Annapolis. Besides the influx of families and friends of the staff, instructors and the Midshipman, it attracts tourists from all over the United States and the rest of the world. Probably the biggest draw and most anticipated event is the flight demonstration performed by the Navy's Blue Angels precision flying squadron.
Some History
At the end of World War II, the Chief of Naval Operations, Chester W. Nimitz, ordered the formation of a flight demonstration team to keep the public interested in Naval Aviation. The Blue Angels performed their first flight demonstration less than a year later in June 1946 at their home base, Naval Air Station (NAS) Jacksonville, Florida. LCDR Roy "Butch" Voris led the team, flying the Grumman F6F Hellcat.
Adding Some Ventilation Inside The Boat


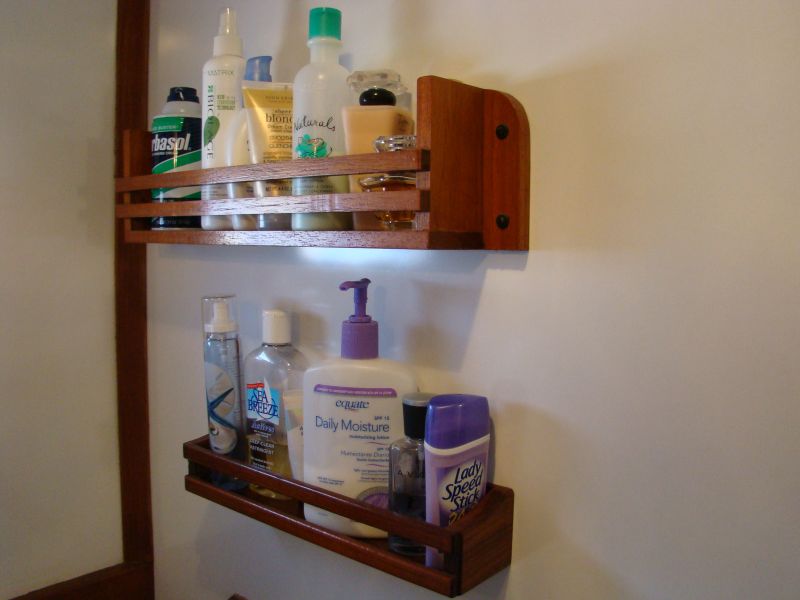
In the past, we have used a variety of vent grills. Our previous boat had an all teak interior just as this one does. So naturally we use teak grills for that finished look. But aside from the fact that these teak grills are way too expensive, in my opinion, need to be varnished and the slats are easily broken if something heavy inside the locker falls against them. We have had this happen on more than one occasion.We have used stainless steel grills and they work fine, but just don't look right to us. With the areas we wanted to cover done in a dark teak, we were concerned that anything white would stand out too much. So our options were black or brown, and square or round. The brown grills we could find were either too flimsy or designed to have an air-conditioning duct attached, and stuck out too far in the back. We found a nice, sturdy, black, round grill and ordered 6 of them to do the surfaces we wanted to vent.


Storage And Stowage On A Liveaboard Boat


The galley area holds 4 large drawers, 2 cabinets and a large open area under the windshield. The drawers were optimized using plastic dividers and small plastic baskets wherever they would fit. The area under the windshield would hold additional galley implements stored in wicker baskets, and glass and plastic containers that could have their lids secured. We also have large open shelves at the aft end of the main salon that would be utilized as storage for most of our snacks, chips, cereal, etc. again using wicker baskets, large zipper-type plastic bags and air-tight plastic containers. We used a non-skid drawer liner found in rolls at most hardware stores to keep everything from sliding around. Hanging fishnet bags are great for fruits and baked goods, and lots of other things. Hanging cup holders are used to slide wine glasses and stemmed tumblers into, allowing them to hang upside over the shelf in the main salon, freeing up the available cabinet space for vertically stacked plates and stacking cups.


 The next step is to look for small modifications that can pay off in a big way. We found that there was space under the bottom step that actually would accept large flat plastic containers like those used to store items under a bed. By removing the step tread and the front of the bottom step, we found the plastic containers could be slid inside the steps and with very little carpentry work. The front and tread could be easily removed and replaced to gain access to this otherwise unusable space. Also, the space between the first and second step was deep and open. We enclosed the area just under the first step with a nice piece of teak with an opening cut in it to allow shoes and other items to be stored where normally there would be nothing. Because we cut this in an oval shape, we used split electrical wire loom that fit over the cut edges to finish it off. Large open areas such as under the forward v-berth can be sectioned off and allow much more to be stored than if it were a big open area.
Remaking The Boat Shower Take 2

 First we had to remove the mirror, towel bars, soap dishes, teak racks, and whatever items were attached to the walls, and remove the sink, which slides out from behind the head and has a diverter in the faucet for the shower hose. The plumbing lines to the sink had to be capped off so we could use the fresh water system until the project was completed. Then the original wall covering could be removed. The old material was actually quite easy to remove with a heat gun and a wide scraper. With a few passes of the heat gun and the scraper behind the panel, as soon as the old adhesive warmed up a bit, the panel pulled loose. It was a bit tedious but the panels came off in large pieces with minimum effort and since the old adhesive that held them up was pretty thin, there was only a little sanding
  needed to get the plywood behind it ready for the new panels. Once the old panels were off and the plywood sanded, we used a two part penetrating epoxy to further seal the walls against water intrusion. The under-layer of plywood was in excellent condition and there were no signs of water leaking into it at any point. This was probably because none of the past owners had ever installed a shower on the boat in either head. With the walls now sealed, it was time for the next step.
 Since there are no square corners on a boat, simply measuring an area and cutting the panels to fit would not quite work for us. So it was necessary to make templates for the three areas we would be covering with the panels. We needed something that would allow us to work in the small space and still be rigid enough to maintain its shape and size when we transferred the shape to the FRP panels. After a little thought and a walk through the local hardware store, we settled on using underlayment for Laminate Flooring. It is very inexpensive, comes in 48-inch rolls and has just the rigidity needed. By cutting sections just slightly larger than the area for which we needed to make the template, the material was taped to the longest straight run on the wall. Then, the material was marked off with a felt pen and cut to size with a pair of scissors. Once cut to size, the templates were placed back on the walls to be sure the fit was right.
  Next the templates were transferred over to the panels, placing them in reverse on the back of the panels and marking them with a felt marker. The panels were cut with our Ryobi battery operated circular saw and a saber saw, both with fine blades for cutting plastic. The circular saw made all of the straight cuts and the saber saw did all of the irregular cuts. Once the panel was cut it was held up on the wall and dry fitted. They usually needed a little adjustment depending on how complicated the pattern was. We had also purchased the inside and outside corner moldings for the panels so they were also cut to size. Placement of the moldings need to be considered, since they fit behind the panels, you have to determine when the molding needs to go on in relation to the panel already up and the next one to go up. Once all of the pieces of the puzzle were cut and their fit confirmed, it was time to attach them to the wall. There are a few options to glue the FRP panels to the walls, and we chose the Liquid Nails specifically for these panels.
  The Liquid Nails adhesive was removed from the can and smeared on the plywood with a putty knife and then spread out over the area with a notched trowel like those used to apply adhesive for ceramic wall tile. The notches apply just the right amount of adhesive as long as the entire surface is covered, being careful to not leave any bare spots. The adhesive requires that the material be set into it within 45 minutes or before the adhesive begins to skin over. With this in mind, we did each of the three sections, one at a time. In addition to the adhesive, all corners were thoroughly caulked with 3M 4200 to insure water would not leak into the corners. With good coverage with the adhesive and the panels in place, it
  was necessary to place braces made from 1”x 2” strips between the panels and the opposite wall, to hold the panels tight into the adhesive until it had time to dry. This was due to the rigidity of the panels and the tendency to pull away where the walls or panels were bowed.
 All items attached to walls where sealed with caulking so that even the screw holes could not leak. We added a shower curtain slide system on the ceiling that would allow the shower curtain to slide easily but would keep it close to the walls. This gave us maximum space with the shower curtain in place and left a feeling of openness to the shower. Towel rings, teak racks, the mirror and a shower caddy for soap, shampoo, wash cloths, etc. all went in strategic locations. Everything worked out just as we planned and the shower turned out to be all we had hoped for. While we had the sink removed, we used to opportunity to paint areas that were hard to get to, like the inside of the hull behind the
  sink. We also painted the area under the head where the new thru-hull had been installed before we launched. Once the project was completed and we had our first shower of the season on board, we were very pleased with our modifications. And the entire shower proved to be very water tight as we had hoped. Now for the next project.
DSC Radio Safety Alert

With the proliferation and popularity of DSC radios, we felt you needed to be advised of this important potential safety issue. The following is a Safety Alert issued by the U.S. Coast Guard:
Dangers Associated with Automatic Channel Switching on Digital Selective Calling (DSC) Equipped VHF Marine Radios
It has come to the Coast Guard's attention that an automatic channel switching feature found on certain models of Digital Selective Calling (DSC) equipped VHF marine radios may create an unintended hazard by automatically switching from a working channel that might be in use at the time to Channel 16 when the VHF marine radio receives a DSC distress alert, distress alert acknowledgment or other DSC call where a VHF channel number has been designated.
This could happen without a vessel/radio operator's immediate knowledge and could initiate an unsafe condition by which the vessel/radio operators would believe they were communicating on a working channel such as Channel 13 when, in fact, they were actually on Channel 16. Imagine a towboat operator on the lower Mississippi River making passing agreements on VHF channel 67 and then suddenly, without warning, not being able to quickly reestablish communications with those vessels because his/her radio automatically switched to Channel 16 instead. Since this unsafe condition can happen at any time, the Coast Guard strongly recommends disabling the automatic channel switching feature when maintaining a listening watch or communicating on the designated bridge-to-bridge radiotelephone, or while monitoring the vessel traffic services (VTS) channel. Radios that lack the disabling feature should not be used for bridge-to-bridge or VTS communications.
The International Telecommunications Union Sector for Radiocommunications, Recommendation M.493-11 published in 2004 and later versions require DSC-equipped radios to provide for disabling of this channel auto-switch feature. In the United States, the Federal Communications Commission (FCC) requires all DSC-equipped radios certified after March 25, 2009 to meet this requirement. Manufacturers that do not provide a disable function are encouraged to do so and to inform their customers if means for correction exist. Updated information including a listing of manufacturers of radios believed to be affected by this Safety Alert will be posted as available at http://www.navcen.uscg.gov/marcomms/gmdss/dsc.htm .
The Coast Guard strongly reminds radio operators and other users to always ensure they are on the proper operating channel when communicating or maintaining watch, particularly with DSC-equipped radios capable of channel auto-switching.
This safety alert is provided for informational purposes only and does not relieve any domestic or international safety, operational or material requirement.
Developed by the Spectrum Management and Telecommunications Policy Division (CG-652),
United States Coast Guard Headquarters, Washington, DC. Questions should be directed to Mr. Russell Levin at (202) 475 3555 or Russell.S.Levin@uscg.mil
Coast Guard Sets Weather Buoys In The Chesapeake

5th District Public Affairs
U.S. Coast Guard

Photo Release
NOAA your weather
Coast Guard, NOAA set seasonal buoys to gather weather data
 |
 |
 |
 |
 |
 |
 |
BALTIMORE - The Coast Guard along with the National Oceanic and Atmospheric Administration conducted seasonal buoy replacements Monday in the Chesapeake Bay.
The Coast Guard Cutter James Rankin, a 175-foot coastal buoy tender homeported in Baltimore, maintains approximately 375 aids to navigation and conducts fall and spring buoy replacements annually.
Weather buoys collect data and report real-time environmental information including wind speed, temperature and wave height. The buoys also serve as interpretive buoys that mark the Captain John Smith Chesapeake National Historical Trail that runs throughout the Chesapeake Bay."The weather buoys provide valuable weather information during peak recreational boating seasons," said Lt. Dave Lewald, the commanding officer of the Rankin. "The buoys also provide historical data which can benefit researchers collecting information on how to clean up the bay."
Click on the photos above to view a higher resolution version and more specific caption information on the Coast Guard Visual Imagery site.
For more information visit www.ndbc.noaa.gov or visit http://www.ndbc.noaa.gov/station_page.php?station=44043 to view data from the weather buoy pictured above.
Subscribe to:
Posts (Atom)


